Terminology and Adaptation
This article describes various ways of Language Identification adaptation.
Basic terminology
For example, languageprints created using model L4 can be combined into languageprint archive and/or language model only with languageprints created using model L4 and language pack for model L4 must consist only from language models created using languageprints/archives of model L4.
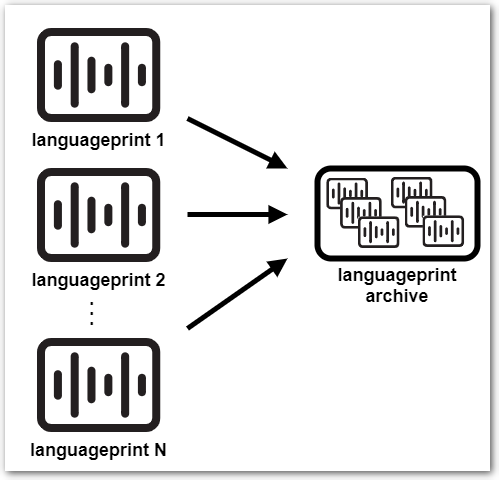
| Language print (*.lp file) | Numeric representation of the audio, extracted from audio file for language identification purpose of (similar to “voiceprint”, but representing sound of the spoken language, not sound of the speaking person) |
|---|
| Languageprint archive (*.lpa file) | Multiple languageprints combined into single archive Languageprint archives come pre-created with the Language Identification technology, or can be created using separate command line tool lppack (up to version 3.50) or using phxcmd lppack command (version 3.51 or newer). SPE does not support creation of languageprint archives, they are supported as input only. |
|---|

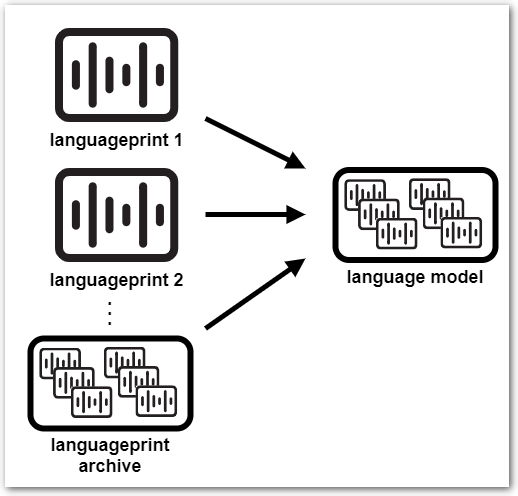
| Language model | Digital characteristics of a specific language Language model can be trained from languageprints (_.lp), language prints archives |
|---|

The LID language model should not be confused with LID technological model, like L4, L3, XL3, etc. which refer to the LID technology generation
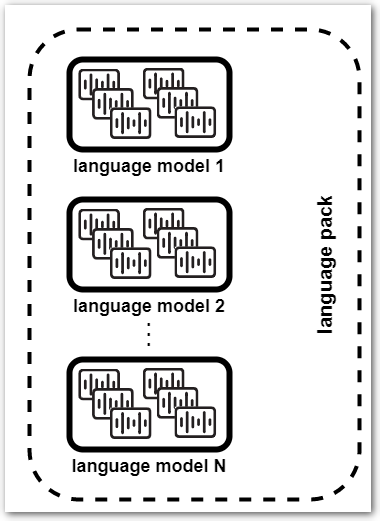
| Language pack | Set of language models used for language identification |
|---|

Adaptation types overview
- Creating new language model from your own audio files, to add new language
not supported out-of-the-box
- at least 20 hours of audio is required, see requirements below
- Enhancing existing language model by adding your own audio files to
existing built-in language
- at least 5 hours of audio is required, see requirements below
- Creating custom language pack consisting of your chosen set of languages, both pre-trained or created from your audio files
Audio recordings requirements
- Format: WAV, FLAC, RAW with linear coding 16bit/8bit, sampling rate 8kHz+
- Wide variety of speakers (50+) of various age and gender is required, to ensure rich variety of "language sounds"
- Only single language in the dataset
NOTE: mixing in a different language negatively affects the resulting recognition accuracy - Audio length: ideally between 1 and 5 minutes of speech signal
NOTE: it is not possible to train a language using just a few and long audio files (like 5 files, 1 hour each) - Acoustic channels should be as close as possible to channel of intended deployment
Adaptation using REST API (SPE 3.38 or newer)
SPE 3.38 and newer include LID adaptation tasks in REST API, which makes the adaptation significantly easier than in previous versions.
Creating language model
Language model can be created from languageprints (*.lp) extracted from audio
files, or from pre-trained language prints archives (*.lpa), or from
combination of both.
Combination of both .lpa and .lp is used when enhancing existing language
model – the .lpa is the existing language model and the .lps are created
from your audio files.
- Extract languageprints from you audio files
usingGET /technologies/languageid/extractlpendpoint - Create new (yet empty) language model
usingPOST /technologies/languageid/languagemodels/{name}endpoint - Upload languageprint- or languageprint archive file to the language model
usingPOST /technologies/languageid/languagemodels/{name}/fileendpoint- repeat this upload for all necessary files – e.g. when creating completely new language model from your own audio files, this would be hundreds or thousands of files (see audio requirements above)
More details are available in the REST API documentation: https://download.phonexia.com/docs/spe/#examples_languageid_create_lmodel
Creating language pack
- Get list of language models available for creation of your language pack
usingGET /technologies/languageid/languagemodelsendpoint - Create your custom language pack
usingPOST /technologies/languageid/languagepacks/{name}endpoint
More details are available in the REST API documentation: https://download.phonexia.com/docs/spe/#examples_languageid_create_lpack
Adaptation using command line
It is also possible to perform the LID adaptation tasks using command line tool
phxcmd.
NOTE: Version 3.37 or older does not contain phxcmd, but multiple separate
tools instead. If you are using such version, simply omit the phxcmd in the
commands, e.g.:
- use
lpextractinstead ofphxcmd lpextractfor extracting languageprints from audio files - use
lppackinstead ofphxcmd lppackfor creating languageprint archives - use
lidinstead ofphxcmd lidfor language pack training
Creating new language
STEP 1: Extract languageprints from recordings using lpextract command.
The example below demonstrates commands to extract languageprints from audio recordings in 2 languages, each language located in separate directories
- recordings in first language are located in
/path/to/my/audio/MyLanguagedirectory - recordings in second language are located in
/other/path/to/audio/MyOtherLanguagedirectory - created languageprints get stored to
/path/to/my/languageprints, each language to its own separate subdirectory - we use the "L4" model, hence the
_l4configuration file suffix
./phxcmd lpextract -v -c /path/to/lid/settings/lpextract_l4.bs -d
/path/to/my/audio/MyLanguage -e wav -D /path/to/my/languageprints/MyLanguage
./phxcmd lpextract -v -c /path/to/lid/settings/lpextract_l4.bs -d
/other/path/to/audio/MyOtherLanguage -e wav -D
/path/to/my/languageprints/MyOtherLanguage

etc. for more languages...
where:
-vparameter tells the tool to provide verbose console output-cparameter specifies path to.bsBSAPI configuration file forlpextract(use suffix according to LID technological model you are using - "l4," "l3," "xl3")-dparameter specifies path to input directory with source audio files-Dparameter specifies path to output directory where you want to have the extracted languageprints stored
NOTE: the directory name will be used as the language name in next step-eparameter specifies file extensions to be included in languageprint extraction (if you have raw files instead of wav, the extension would be e.g. "raw")
If you want to enhance existing language using your own audio files – as
opposed to creating new language from scratch – copy the existing pre-trained
.lpa file into the directory with your languageprints before continuing to
next step.
Make sure to use the .lpa file from correct LID technological model ( "L4,"
"L3," "XL3")!
STEP 2: Pack the individual languageprints to languageprint archives using
lppack command.
You need to specify path to parent directory of the directory holding your
languageprints extracted in the previous step. The subdirectory name(s) will be
used as languageprint archive name(s).
In the example below
- we use input directory
/path/to/my/languageprintsfrom previous step, which contains subdirectoriesMyLanguageandMyOtherLanguagewith extracted languageprints (also used in previous step) - we use output directory
bsapi/lid/lprints/l4, which is the directory containing the pre-created languageprint archives supplied by Phonexia – you can put them anywhere else, just make sure to use the correct path in the listfile when creating the language pack (see further below)
The lppack command automatically names the created languageprint archives
using names of the subdirectories, i.e. in our example it will be
MyLanguage.lpa and MyOtherLanguage.lpa.
./phxcmd lppack -v -d /path/to/my/languageprints -D bsapi/lid/lprints/l4
where:
-vparameter tells the tool to provide verbose console output-dparameter specifies path to input parent directory-Dparameter specifies path to output directory where the output languageprint archive(s) will be created
NOTE: the archive(s) will be named using names of subdirectories under the input directory
Resulting languageprint archive(s) can be used for creating custom language packs, see below for details.
Creating language pack
STEP 1: Prepare a listfile with list of languageprint archives corresponding
to the languages you want to have in the language pack – each line starts with
language name, followed by a TAB or SPACE character, and a path to the
.lpa file.
Make sure that
- paths are valid – relative paths must be relative to the location of your list file... or simply use absolute paths
- paths lead to the correct technological model directory of your choice (
l4,l3,xl3, ...)
Example below assumes that the listfile will be saved to {SPE} directory
(hence the relative paths to bsapi/...) and also assumes the "L4" model. You
should reflect your setup accordingly.
cs-CZ           bsapi/lid/lprints/l4/cs-CZ.lpa
pl-PL           bsapi/lid/lprints/l4/pl-PL.lpa
en-GB           bsapi/lid/lprints/l4/en-GB.lpa
ru-RU           bsapi/lid/lprints/l4/ru-RU.lpa
MyLanguage      bsapi/lid/lprints/l4/MyLanguage.lpa
MyOtherLanguage bsapi/lid/lprints/l4/MyOtherLanguage.lpa
Save the listfile as e.g. MyLanguagePack.txt.
STEP 2: Train language pack using the listfile and lid command.
Example below assumes that MyLanguagePack.txt listfile is located in the
{SPE} directory (as per the step above) and uses the "L4" model... The
l4_MyLanguagePack is the chosen name of output directory where the trained
language pack will be stored:
./phxcmd lid -v -c /path/to/lid/settings/lid_l4.bs -l MyLanguagePack.txt -train -M bsapi/lid/models/l4_MyLanguagePack
where:
-vparameter tells the tool to provide verbose console output-cparameter specifies path to.bsBSAPI configuration file forlid(use suffix according to LID technological model you are using - "l4," "l3," "xl3")-lparameter specifies path to input listfile created in previous step-trainparameter tells the tool to train new language pack-Mparameter specifies path to output directory where you want to have the language pack created
NOTE: it is strongly recommended to use a subdirectory of "models" directory, to simplify the language pack registration to SPE
STEP 3: Register language pack to SPE and verify that it works as
expected.
See
Using custom language pack in Speech Engine
chapter for details.
Using custom LID language pack in Speech Engine
To use customized LID language pack in Speech Engine, it’s necessary to
- ensure that language pack placed in correct location, so that Speech Engine can find it
- register and enable the language pack in SPE using
phxadmin
1) Put the language pack in correct location
In order to be recognized by Speech Engine, the language pack needs to be in a
correct location. The location is <SPE_directory>/bsapi/lid/models – if
you have followed the above instructions correctly, your language pack should be
already in the right place.
If the directory with your language pack is not there, copy it there.
2) Register the language pack in Speech Engine
First make sure that Speech Engine is not running.
Then run phxadmin tool with add-language-pack parameter pointing to the
language pack directory and config parameter pointing to appropriate Speech
Engine configuration file:
Example (on Windows, use / instead of -- as parameter delimiter):
./phxadmin --add-language-pack="bsapi/lid/models/l4_MyLanguagePack" --config="settings/phxspe.properties"
where:
--add-language-packparameter specifies path to your language pack directory--configparameter tells the tool which SPE configuration file to use
Default Speech Engine configuration file issettings/phxspe.properties.
However, when using Phonexia Browser in "SPE on localhost" mode (also known as "Embedded SPE"), the configuration file issettings/phxspe.browser.properties.
(Make sure to use the right configuration file, otherwise you might register the language pack to different configuration and therefore it won't be visible where you would expect it.)
phxadmin then asks under which LID model and under which user should the added
language pack be registered.
In the example below we are registering it under "L4" model (since we used "l4"
source files to create it) and under "admin" user:
List of supported LIDC models:
- L4
- XL3 Choose model of LIDC [1]: 1 Login: admin Language pack 'l4_MyLanguagePack' has been added to user 'admin'.
Then launch Speech Engine.
If everything was done successfully, you should see the new language pack
- listed in response to
GET /technologies/languageid/languagepacks
REST query
- i.e. available for use in
model=...parameter in GET /technologies/languageid REST queries
- i.e. available for use in
- listed in Language models pane in Phonexia Browser
- i.e. available for selection for processing by Language Identification in Browser